Primary Times - the definitive what’s on and where to go family guide of activities and events for children of primary school age. Things to do with your kids during the school holidays including arts and craft activities, music and theatre for children, parties, competitions, days out, and family attractions along with term time drama schools, dance classes, after school clubs and sports activities. Things to do at a place near you!
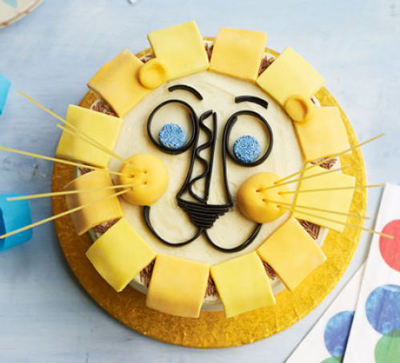
Happy Lion Birthday Cake
 Ingredients:
- 250g pack unsalted butter
- 50ml whole milk
- 150g whole natural yogurt
- ½ tsp vanilla paste or extract
- 3 large eggs
- 250g white caster sugar
- 300g self-raising flour
- 2 tsp baking powder
To fill and cover
- 200g unsalted butter, very well softened
- 300g icing sugar
- 1 tsp vanilla paste or extract
- 2 tsp whole milk
- 2 heaped tbsp raspberry jam (or lemon curd)
To decorate the cake
- 25cm cake board, or cake plate
- yellow or orange food colouring paste ( we used Sugarflair Egg Yellow)
- about 350g white sugar paste
- a few strands of spaghetti, snipped into finger lengths
- a little icing sugar, sifted, for rolling out
- 2 liquorice Catherine wheels with blue middles
- about 2 tsp chocolate sprinklesIngredients
- 250g pack unsalted butter
- 50ml whole milk
- 150g whole natural yogurt
- ½ tsp vanilla paste or extract
- 3 large eggs
- 250g white caster sugar
- 300g self-raising flour
- 2 tsp baking powder
Method
- Heat the oven to 180C/fan 160C/gas 4. Use a little of the butter to grease the sides and bases of two 20cm sandwich tins. Melt the rest of the butter in a small saucepan. Off the heat, add the milk, yogurt and vanilla, followed by the eggs. Beat well with a fork.
- Put the dry ingredients plus ¼ tsp salt into a large bowl. Whisk to combine – this aerates and saves sifting. Tip in the wet ingredients and whisk to a smooth, silky batter.
- Don’t hang around at this point. Pour the batter evenly into the prepared tins and put onto the middle shelf in the oven. Bake for 25 mins or until risen and a skewer inserted into the middle of the cakes comes out clean. Cool for 10 mins in the tins, then carefully invert the cakes and leave to cool upside down on a cooling rack.
- Make the buttercream. Put the butter into a large bowl and sift the icing sugar on top. Add the vanilla and milk and a pinch of salt then beat for a few mins with electric beaters until creamy, pale and spreadable.
- Place one of the cakes onto the board or plate, and use a dab of buttercream underneath the cake to stop it slipping about. Spread with 1/4 of the buttercream and then all of the jam, if using.
- Sandwich the second cake on top. Set aside 1 tsp buttercream to affix the ears later, then mound the rest on top of the cake. Use a palette knife to paddle it evenly over and down the sides. Set aside.
- For the lion’s mane and cheeks, use a little of the colouring paste to colour the sugarpaste yellow or orange, then split the paste in half. Add more colouring paste to one half and knead again to make it a shade darker. Roll two walnut-size balls of the darker paste to make the cheeks. Poke in the spaghetti to make whiskers, then set aside.
- Using a little icing sugar, roll out the rest to about 2 x £1 coin thickness then cut into 12 squares measuring about 4 x 4cm. Re-roll any trimmings. Shape two small blobs into ears.
- Position the squares around the cake, alternating lighter and darker yellow. Let the squares overhang the cake slightly with only the innermost corners meeting. Scatter the chocolate sprinkles into the gaps in-between.
- Unroll a Catherine wheel. Cut two lengths of 20cm. Loop one end of each piece, then position on the cake to make the eyes and sides of the lion’s nose. Poke into the buttercream. Add another strip of liquorice down the centre of the nose and a wiggly line to one side to give it some shadowing, if you like.
- Make the bottom of the nose by snipping ever-decreasing lengths of liquorice and poking them into the buttercream.
- Add two more curls for his mouth and two for eyebrows. Position the round cheeks to the sides. Put the middles of the Catherine wheels towards the bottom of the eyes to make pupils.
- Put the cheeks onto the lion’s face. Fix the ears on top using a small blob of leftover buttercream. Leave the cake to set for an hour before cutting. If the sponges are used fresh or within a day of baking (wrap well once cooled), the finished cake will keep in a cool place (not the fridge) for 3 days.
Recipe from www.bbcgoodfood.com


